The BPX blockchain mainnet was launched in January 2022 as a regular fork of the Chia project. We chose Chia codebase because of its great consensus algorithm – Proof of Space and Time, where people uses their hard disk drives to generate new blocks. Unfortunately, every day makes us believe that the rest of the blockchain architecture and especially a Lisp-based smart contracts programming language is not the way we want to go. We decided to create our own custom blockchain, fully compatible with Ethereum, where you can build smart contracts in Solidity language, but still based on the Chia Proof of Space and Time consensus. Now it’s time to end the life of old BPX blockchain and migrate to our new network.
The migration will take place when the old blockchain reaches a block height of 2,300,000. According to calculations, this falls on May 25, 2023, but the speed of generating new blocks may fluctuate. Block number 2,300,000 will be the last block where the farmer will be rewarded on the old chain. At the same time, the mainnet of the new V3 network will be launched and all subsequent block rewards will be distributed there. This article describes how to prepare for a migration.
1. Update your legacy mainnet node ASAP
We have released the old blockchain client version 2.1.0. This is the last release ever of BPX as a regular chia fork. This version introduces a hard fork at height of 2,300,000 which reduces block rewards to 0. If you want to be able to transfer your funds from the old BPX blockchain to the new one when it becomes available, you must install this update. If you do not install this update, you’re stuck in the sidechain and your further rewards on the old V2 network after block 2,300,000 will be invalid anyway, so you will not be able to transfer them to the new network, or exchanges, or users who have applied the update. The funds accumulated before reaching block 2,300,000 will be transferable to the new V3 network in a 1:1 ratio soon after new mainnet launch.
💾 Download BPX Blockchain 2.1.0 here:
https://github.com/bpx-network/bpx-blockchain/releases/tag/2.1.0
2. Install Execution Client
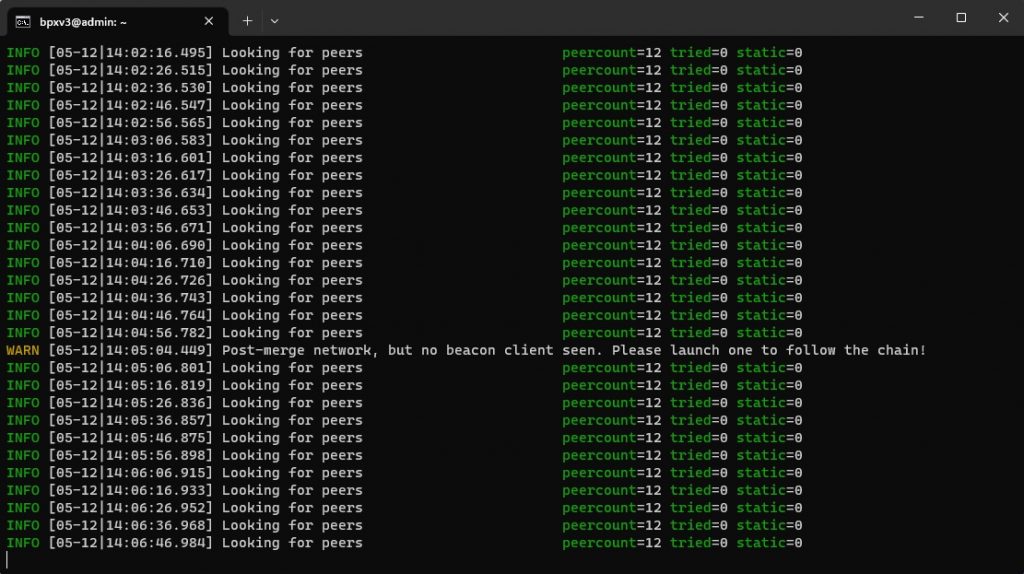
BPX V3 network full node requires running two separate applications to synchronize with the network: Beacon Client and Execution Client. The Beacon Client will be released just before the migration, because if it was publicly available, any user could initiate the start of the new mainnet right now. The Execution Client is now available for download. You should install it and keep it running in the mainnet mode on all your full nodes and farms. Don’t worry about the warnings that will appear. This is normal and will no longer appear after migration.
💾 Download BPX Execution Client 1.0.0 here:
https://github.com/bpx-network/bpx-execution-client/releases/tag/1.0.0
3. Set up your wallet
The old BPX network had a wallet built into the full node software. BPX V3 does not have such, but it is compatible with the most popular wallets. To keep your V3 network coins, you should set up your wallet, e.g. Metamask. You can do it both on a PC and on a smartphone, which was not offered by the old BPX network. It doesn’t matter what mnemonics (secret words) you use. You can create a completely new wallet key or use the same key as for other networks such as Ethereum, BSC, Polygon. The old BPX chain used the same private keys for reading plot files and for accessing a wallet. In BPX V3 this is not related in any way.
After installing Metamask, add a new network by entering the parameters as below:
Network name: BPX V3
New RPC URL: https://rpc.mainnet.bpxchain.cc
Chain ID: 279
Currency symbol: BPX
4. Wait for the migration block
If you have done all the above steps, all that remains is to wait until the old blockchain is approaching the block height of 2,300,000. When there are only a dozen of blocks left to this height, go to the next step.
5. Install Beacon Client
A few minutes before the migration, the Beacon Client will be available to download at the address below. Install it and run. In the Farm tab, select “Manage farming rewards” and paste your Metamask wallet address where you want to receive block rewards. In the Plots tab, add your keys related to the plots you want to use, then add the plots. If you are using CLI-only version, all settings and commands work the same way as in the old version. The rewards target address is set in the config.yaml file, in the “beacon” section as “coinbase”.
💾 Download BPX Beacon Client 3.0.0 here:
https://github.com/bpx-network/bpx-beacon-client/releases/tag/3.0.0
In the next article, we will explain how to transfer your funds from the old blockchain to the new one. Stay tuned.
The version 3 database must be the same as version 2 “db/blockchain_v2_CHALLENGE.sqlite” I have the database in an external path